Recreating the Classroom in Unreal 5 and 3DS Max
Introduction
We were tasked to recreate the classroom we study in in 3DS
Max and Unreal Engine 5 in pairs to the best of our ability in 4 days. This was
to develop our 3D modelling skills and level creation, as well as warming up
our skills for future projects.
The purpose of this post is to record how I created the 3D
Models for the Unreal 5 project, and how I made the, so I can track my progress
throughout the course as well as come back and look at the 3D Models I have
made.
Recreating
the Classroom in Unreal & 3DS Max
In my pair I was tasked with doing the 3D modelling as I had
the most experience with the art side of games development and I felt
comfortable with the process of 3D modelling.
My first task was to list down everything I needed to 3D
models, and the priority order. I decided the door, windows and lights, were
the most important to do first, however I was going to make them quickly so
then later, I could add more details and rescale them, but it was best to have
basic 3D models to put into the level first. After the door and window, I also
decided the next 2 things that should be made are the chairs and computers, and
last should come the keyboard and mouse, as well as the pipes, radiators and
magazine stand should go last as they weren’t as important.

Door
The door was made by creating a
thin and tall cuboid and using the quick slice tool to add extra polygons to
extrude the door handle and window. I tried to keep to low poly, and with
minimal detail as it wasn’t important that the door was realistic yet, if I had
the base proportions and blocks down, I could build from it later and it could
be used as a place holder in the game level.


Windows
The windows I also kept relatively simple, creating a cuboid,
they are using the quick slice tool to add extra polygons, then just using the
extrude and bevel features to create the illusion of lot of detail and
intricacies. However, I had too make 2 models, as we had 2 different types of
windows, one smaller and older at the front of the classroom, then 3 at the
back which were modern and bigger (we also had some modern ones on the ceiling
that are tilted, however I forgot too model these, and I didn’t see it as a
pressing matter as my teammate hadn’t made the roof of our class room yet.
For both mirrors, I also used the Mirror modifier, so I
didn’t have to repeat my work on the other side too save me time, and to make
it look more accurate. On the larger more modern windows, I also deleted the
back plane as the player’s wouldn’t be seeing it, and it reduced the number of
polys my model had.
Lights
The lights were also simple too make as I decided not too
make them too complicated or add the chains, so instead I started from a simple
rectangle, and like the others I used the quick slice tool and the extrude tool
to create the basics of the light, I however did try and keep the light
accurate to what they look like in the classroom, but without much detail as
the player wouldn’t look at the light too much, nor would much of it be visible
if a bright light source was placed there.

Chair
The chair took much longer to make and many more iterations
(which I was not able to get screenshots of), however it was the model I learnt
the most from.
Iteration 1 – With my first version of the chair, I wasn’t sure how to
attach objects to each other, so I tried building it out of just one shape but
making a long cuboid for the bottom of the chair, then using the quick slice,
extrude and scaling tools to make the to create the sitting part of the chair.
I very quickly realised that this was illogical and unlike the other models,
would be best made from separate shapes. So, I set about learning how to attack
different shapes to each other by using the geometry option called Attach, to
make my process of creating this 3D model easier.
Iteration 2 – I started with the pole at the bottom of the chair with
making a cylinder, then creating the legs of the chair separately. And trying
to attach them to the pole. I made the legs by creating a long cuboid, then
using the quick slice tool and the chamfer tool I created a relatively accurate
bend to the legs. However, it took a long time to decide how I wanted to make
the wheels, but I eventually decided on a cylinder, and using the extrude tool
to create the joint between the wheel and the leg. However, with this
iteration, it was incredibly hard to make the legs look even on the pole and
connecting them ended up in a big mess of vertexes everywhere. So, I knew for
my next design I had to do something simpler.


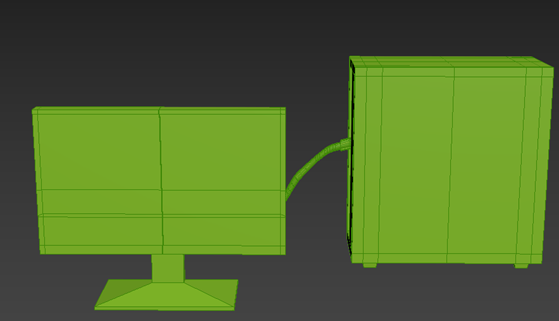
Computer + Monitor
For the computer and Monitor I knew I wanted them both to be attacked by a big wire, too creature more of an illusion of detail, and because the creation of the monitor an PC were both very simple. The monitor I created a cuboid with a mirror modifier, then I used the extrude and quick slice tools to add the stand, base, and the frame of the monitor screen. The PC was essentially the same, making a large cuboid, and extruding legs, and a divot in the side where all the wires, jacks and fans would be.

Keyboard
Too make the keyboard, I made a
simple cuboid, tilted it, then used the quick slice, extrude, and bevel tools
to make the blocks of where the keyboard keys would be. Making the individual
keys would take too much time and processing power when placed into unreal, so
I just created blocks of where the keys would be.

Mouse
For the mouse, I started with a
small chamfer box, then used the soft selection tool to create a rounded point
and dip, using the chamfer tool also to make it more rounded. Made the wheel of
the mouse separately as a cylinder, attaching it in the right place with the
geometry attach. I also used the extrude and quick slice tools to make a divot
in the middle of the mouse, as well as the buttons on the side.

Magazine stand.
For the magazine stand, I knew
each section that held the magazines were the same and placed evenly, but where
too complicated to use the mirror tool as there would be too many places where
it would need it. So, I made the first section by itself, adding a mirror modifier
down the section and then using the extrude and quick slice to turn the long
cuboid into something that resembled one section of the stand. I then copy and
pasted this 3D model to the next side to create one row, then I used geometry attach
so they were one object, then just copy and pasted that 3 other times, stacking
each one top of the other and then attaching them all together.

The Finished Product
This is the finished product, after my teammate textured it,
built the level and added lighting into Unreal 5.


Comments
Post a Comment